Monday, May 30, 2016

still learning my camera

A whole bunch of pictures taken today, as I learn more and more about using my DSLR camera.  Back in 1980 or 81, I took a course to learn to use my actual non-digital SLR camera.  It had film and everything!  I think it was in community ed.  I think I learned a lot faster back then!  Each week, our teacher gave us some homework and had us get our pictures printed on a contact sheet so we didn't have to pay to have them all developed and printed in full size.  Then we could do comparisons during our lessons.  Then, flash forward to digital, and they make it easy to practice because I can take LOTS of pictures and view them in larger sizes on my screen.  And I never have to buy film!

So, sorry if you came looking for quilts today!  There is one token fiber picture at the end!

A busy little iridescent insect scampered across the patio blocks.
If he would just sit still I would have a better shot!

Perennial geraniums and mosses on a short retaining wall.
We built this little wall by our backdoor in 1988, I think,
and it has retained quite well, with a little crumbling from age.
I guess I could say the same for myself!

This winter hardy shrub rose was planted at the same time as that wall was built.
It still blooms no matter how much I ignore it!

Hostas grow well in our yard because we have many
fully grown shade trees.  They thrive on benign neglect!

This little plant is a relative of the bleeding heart.  Its leaves are fern-like.
And that nasty thistle is doomed!  I love to pull weeds!
The sound and feel as those roots release gives me goosebumps!

One of the large sedum plants.  Beautiful big purplish flowers in autumn.

Your standard bleeding heart bush, near the end of flowering.
These bushes get so overgrown that we have to cut them back.

A little bit of asparagus still showing up in the garden,
but not for much longer.  My asparagus lunch was relished!

I have plenty of thyme, but no parsley, sage nor rosemary.

Rhubarb is on the chopping block!
 I need to harvest some more to freeze for later.

Not from my garden, but they are still beauties!  These are yarns I bought on vacation,
with some cuts of limited edition huckleberry batiks.
They are crazy for huckleberries in Whitefish.  Rightfully so, too.

Saturday, May 28, 2016

souvenirs with special meaning

One of our little side trips during vacation in Montana was to the Glacier Round House Pottery shop in the country near Columbia Falls.  We were there almost 2 years ago and liked their style, so this year we brought a few more pieces of Montana back to Minnesota!  Nice people designing and crafting their goods in a beautiful big yurt.  Actually 2 yurts, I think 1 is their residence.  I remembered that we had a common bond of Gustavus Adolphus College, too, so you know they are good people!

My souvenirs from Glacier Round House Pottery--
serving bowl, 2 glasses/mugs and a drip coffee maker complete
 with a cloth reusable filter.
 I used the drip coffee maker with cloth filter this morning, since I was making coffee for 1, and it worked just peachy!

Are you wondering what I've actually been doing for fabric fun lately?  Well, I did manage to visit 3 quilt shops and 2 yarn shops on the trip, so some fiber found its way into my suitcase along with the pottery!  But aside from that, I have spent a few evenings finishing up the blocks and assembly for this:

It was started last January on retreat and it took a bit to pull it together.  It's all paper pieced so ranks high on the list of putziness, but that's the best way to achieve these triangles and shapes without losing my mind!  Here's the pattern, available at Bear Patch--
 I used a gray "shot cloth" for my background fabric.  It gives a real nice finished look, but I have to admit I didn't like working with it so much because it ravels so easily.  But it turned out well in the end, so that's a good thing!

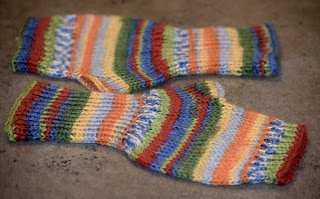
During downtime on our flight or while taking it easy instead of hiking, I had a simple little knitting project along.  The pattern is Sarah's Fingerless Gloves, free on Ravelry.  The yarn was Adriafil from Knitcol, an Italian company.  It's washable wool in a DK weight which is slightly heavier than sock yarn.  I finished them back at home and now they are drying after a bubble bath.


I've also started a new pair of fingerless gloves.  This is a pattern and wool yarn from the Polka Dot Sheep from Knit 'n Needle Yarn Shoppe in Whitefish, MT.  The shop is the home of Polka Dot Sheep goods.  I bought a yarn called Tenderfoot, in the Stillwater color.  It's 80% wool and 20% nylon in a fingering weight.  Would be great for socks, that nylon helps the wool last longer.  I learned early on that pure wool yarn looks and feels great, but doesn't last as long as the nylon blends when being walked upon all day!  I had great help from the woman working in the shop with figuring out what would work best for me.  They are very helpful by phone or online, as well.  This turned out to be my Mother's Day gift from Dan because he had gone to the shop and purchased a gift certificate for me.  Thanks!


I loved the chance to visit one of my most favorite quilts at Dan's!  I even got to sleep beneath it!  This is a New York Beauty quilt by Jan Stone, sewn in 2000-2001 for Dan's high school graduation gift.  He has taken very good care of it!  I just looked up the pattern so I could link it for you.  It's out of print but available on Amazon for a mere $196!  Guess I'll be hanging onto my copy!


Wednesday, May 25, 2016

more montana

Now that I'm back home and back in the groove, it's good to refresh my memory about some of the fun things we did.  And share them with you!

Here's an idyllic little spot in the Mt. Fernie Provincial Park in British Columbia.  We were walking a trail and I noticed jet tracks cutting across the sky almost like they were synchronized flights!  Right above this lush spot with a rushing river.  


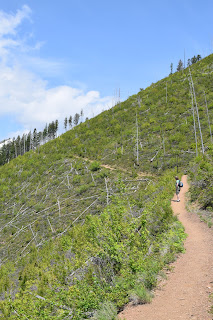
On another day, back in the US, we drove from Dan's place up Big Mountain to the Whitefish Ski Resort area.  And there is a trail there called the Danny On trail, cutting across the snowless ski runs, under the vacant and still chair lifts.  We kept going upward for quite aways, but we didn't get to the end.  You see, I'm a fraidy cat when it comes to cliffs and things, and when there's very little but open air along one side of the trail, I have lots of second thoughts.  I'm doing much better than I used to because I have been pushing myself, but I was out of my comfort zone.  We talked to 2 girls that had started the trail just before us, they were coming back down because there was a fallen tree across the trail.  Plus it was time for our sandwiches and fruit!  So we sat down for a bit, admired the scenery and the bits of snow still remaining.  Keeping the trails clear, no matter where we hiked, was clearly a big job because we saw many fresh cuts of trees that had come down during the winter.  I have a hard enough time just getting myself up those trails, I can't even imagine doing it with chain saws and tools!


One very nice thing about visiting Dan is that I also get to visit some of my quilts and quilty stuff.  I wrote about my Yeti project before, but I had neglected to take a picture of the finished pillowtop.  The quilting was fun on this.  It's 22" square.

Bob and I did several day hikes while Dan was at work.  The tables have officially turned with parents goofing off and son slaving away!  Here's one of those less traveled paths--


If you are curious and want to know about current conditions in Glacier Park, they have several webcams operating and viewable by anyone with a computer.  When we were at the lookout tower on Apgar Mountain, we were able to get our picture on that webcam and timed it so Dan could snap a picture of it from his office!


I've been taking pictures of lots of different flowers, and this was a special discovery.  It was beside a trail near Fernie, BC.  When I saw it, I thought it was something rare because it was the only one I saw anywhere.  Now that I've had a chance to look it up, I found that it is Fritillaria, I think, but I'm not totally sure.  And it does seem to be something not frequently seen in the wild.  Guess I was lucky to spot it!


Thursday, May 19, 2016

vacation time!

One of the best things in life is new adventures.
This time, the adventure takes place in the northwest corner of Montana.  
And into British Columbia for a bit.  
We are enjoying our excursion to Whitefish, MT, thanks to Dan's hospitality.  
Every day brings new scenes that I try to capture and keep forever. 

Dan and Bob hanging out on a foot/bike bridge in Mt. Fernie Provincial Park in British Columbia.  It was a beautiful day outdoors.  Dan always takes off on his bike over hill and dale, while Bob and I walk along the trails that aren't really for bikes.  On this particular trail, I got a little nervous about the great big hoofprints that were left by some wild creature not far ahead of us!

We stopped at a little out-of-the-way brewery, HA Brewing, near Eureka, MT.
This fun French couple were very welcoming to everyone.  And I beat Bob and Dan in cribbage!  That is a rare happening!

I keep taking pictures of flowers along the trails, even if I don't know what they are!


We drove to the northwest area of Glacier Park, outside the park boundary, to the tiny town of Polebridge.  Gravel roads and solar power and composting toilets are pretty much the norm here.  They have a reputation for making fabulous pastries and desserts from huckleberries harvested around there, and we agree that the bear claw we shared was like a little bit of heaven!


Have you been watching or hearing about the "Tiny Homes" movement?  I've seen several examples on TV, and I was excited to see a business building and selling that type of home in Fernie.  I think I could enjoy living in a small place part of the time.  If I had it all to myself.  And if I had an additional tiny home for my fabric!  And if it did not have a composting toilet!


Tuesday, May 3, 2016

how to build a better binding

I take a lot of pride in getting a job done right.  I bet you do, too.  
The final step in getting your precious quilt finished is a prize-winning binding.
Now, I don't know if my bindings are prize-winning because I have never entered them in a contest!  But I do know that they turn out neat, tidy and consistent.  So I'm going to tell you about a couple of very easy things that I think make a difference in the look of my binding when I'm done.

First off, I cut my bindings just 2" wide now.  When I started quilting, the standard binding width was 2 1/2".  Then it shifted over to 2 1/4".  I think it's because of a few reasons, most notably the fact that the battings that I use now are not as "poofy" as they used to be.  I use Quilter's Dream Cotton in the Select or DeLuxe weight.  Either one is pretty compressed, if compared to some other brands.  I used to use Hobbs Heirloom batting 80/20 mix (80% cotton/20% poly).  That worked pretty good, but I found that there seemed to be a lot of variation in the thickness.  Maybe that has changed, but when I started using Quilter's Dream because it was the brand we stocked at Bear Patch, I found my new favorite.

Another reason that I use a 2" strip is that I want the folded edge of the binding to just cover the binding seam when it is folded around and stitched to the back.  I always use a walking foot when I sew on my binding, I've tried to do it without in an "emergency", and it just isn't right!

Also, I'm very careful to get a good 1/4" seam allowance when sewing the binding to the quilt.  Sometimes, my seam allowance strays because the weight of the quilt puts too much drag on the portion that is going under the walking foot.  So I keep a little table or cart handy to park to the left of my sewing table to support the bulk of the quilt as I'm sewing.  Sometimes I even have to go back and correct a section that goes askew.  Don't rush past that, just because you can see the finish line on the horizon!

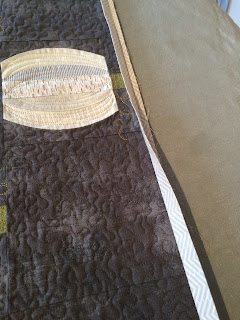
So, after I've finished the machine sewing, I move to the ironing board.  With the right side of the quilt facing up, I press the binding over in the direction that it will need to be folded for the hand stitching.  In the picture below, you can see the bottom section of the binding is pressed over.  It gives a nice crease and makes it easier to do the hand sewing.


In the corners, I just use the point of the iron to nudge the mitered corner out away from the quilt top.


Next, I sit down with a good movie and glass of wine to do the hand stitching.  Or maybe I catch up on a few missed episodes of one of my favorite shows.  Whatever floats your boat!

Finally, after I've taken the last stitch, I go back to the ironing board and press the binding from both the right side and wrong side of the quilt.  It now lays nice and flat and smooth.  
Voila!  Try it for yourself!  Happy binding!